To obtain JN courses on CD for a minimal charge,
contact Roy Barley @ rbarley@dejazzd.com
Design
Tips and Techniques |
First off, I'd like to say thanks for checking out
my design tips and techniques section. Many ideas listed here will be my
personal opinions on course design and certain tips and techniques that I use in doing
course design.
Tee Box Tutorial Bunkers
Tutorial Water Tutorial Greens Tutorial
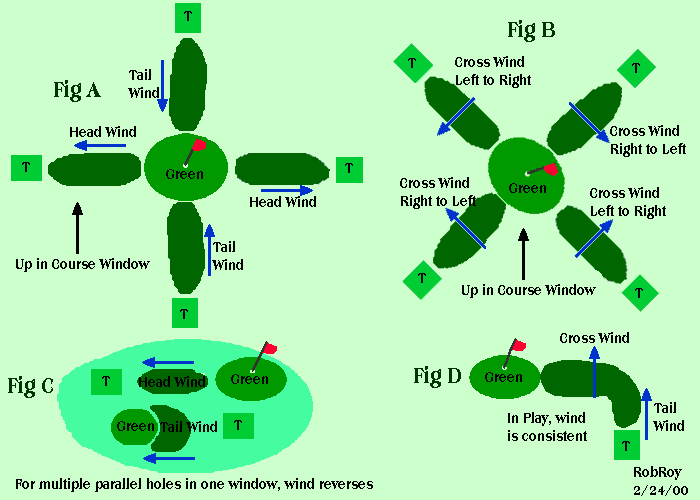
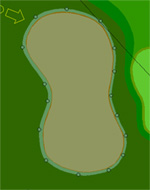
Wind Pictorial By Rob Roy.
This explains wind directions of holes in the designer. After you layout your course
and then do your course
map, you can rotate holes (select hole then right click and select rotate) to get the
desired wind direction
for that hole. Note Fig C for 2 or more holes in a hole edit window.
GBC INI Specs after the object.
Position#1: Height
Position#2: Width
Position#3: Type (1= tree, 2= bushes, 3=
objects)
Position#4: Split (# of pixels up from the
bottom where tree foliage starts)
Position#5: Sinking (# of pixels you want to sink the
object into the ground - Great for grounding trees!)
Position#6: Center of object. (# of pixels from
the left side to the center point. - Great for centering trees)
Position#7: Flip 0 = no flip / 1 = Object flips
in reverse view. This sometimes works pretty good, sometimes does not.
Here is an example of an ini file using these:
Tree6-1.pcx=11.16,11.31,1,250,10,351,1
1Stake1.pcx=1.2,.96,3,1,5,22
I am making available an ini file for you to download. Just rename to match your
course folder name
and put in your own objects names and sizes.
Remember the ini file opens just like a text file. Just double click on it to open.
 ini
file to download
ini
file to download
The following is a list of the texture codes for the ini file:
0 = Heavy Rough
1 = Sandy Rough
2 = Desert Rough
3 = Light Rough
4 = Hazard
5 = NOT USED (Water)
6 = Fairway
7 = Fringe
8 = Tee
9 = Green
10 = Dirt
11 = Bunker
12 = Rough
13 = Lava
14 = Cart Path
My
Personal No-No's of Course Design |
1. Dogleg par
4's. Do not make it a requirement to hit the power drive 320 yards or so to reach
the corner of the dogleg.
I have seen many new courses lately that require this. If you want to make a course
feel like a real course do not do this.
I suggest making a dogleg where the player is required to lay-up using a 1-4 iron or
something like that. This brings strategy
into play. The player can't just hit the driver because it will be long and into the
woods, bunkers or heavy rough..
2. Long downhill par 3's or flat long par
3's. With the JN series these types of holes play very difficult downwind.
They also play very difficult because of the length of the hole requires a long iron / 3w
which is very difficult to stop anywhere
on the putting surface. I have found that making these holes play into the wind
helps keep the ball on the green and makes
these types of holes much more playable.
3. Placement of objects. Lately I have also seen
placements of objects that are just crazy. DO NOT place a huge tree
on the back side of a fairway bunker. You have already been penalized for
hitting it into the bunker. Let's not now make it
an un-playable lie as well. Think about your object placement. Does the object
interfere with the chance to reach the green?
If so, is it interfering with a shot from the fairway? Again, I have played a few
courses in GBC where if you hit a perfect
tee shot in the fairway, you are penalized for doing so because large trees block your
approach. I can understand this
if you are requiring the player to lay-up, but if all angles are blocked than it's a poor
design. If players hit the ball into
the heavy rough or off the fairway, these are the types of areas for trees to come into
play. A poor shot that does not
reach the fairway could be penalized by a tree or trees if that is that type of course.
Even on links style or wideopen courses
like Heathland Downs (JR Reel) does a good job of using this. Even though very few
trees are on this course, if you
miss the fairway, you are still penalized by reaching a well placed bunker, heavy rough or
difficult side hill lie..
4. Course clutter. In my own opinion placing
cars, tons of people, lions-tigers and bears oh-my, on the course
takes away from it. It makes it look more fantasy than even fictional or
real. I can understand those wanting to
place people on the course to give it a real feel I suppose if they moved it would
be better. Please limit
the number of people on the course. Nice wildlife touches are good, just don't
over do it. If I saw a bear
on every hole on a real course, I probably wouldn't go play that course again for safety
reasons.
5. Texture selections. Pick textures that
match! Try and get a texture set that blends well together.
Try and also get textures without a very grainy look to them.
6. Check to make sure your course is complete. I am
seeing many courses being released that are not
complete. I am beginning to wonder how many ever play test their courses before
release.
I spent over a month 1/2 playtesting my last 2 course releases.
John Rivoire has published a great check-list to make sure
everything has been finished and tested. This is must read for all designers.
GBC
Check-List
JN Course Designer
Program Tips |
Did you know that you can do the following to save
time in designing your course ?
1. Right click to copy a shape and then paste it as a different shape and
enlarge or shrink it.
2. Hold the shift key down while selecting the elevation tools to get
exact heights.
3. Hold down the CTRL while selecting objects to get up to 8 at a time
to place.
4. Hide the terrain shape (without deleting it) in rendered view to see
how things acutally look.
( Go to the menu bar and select TERRAIN / Hide in rendered view)
5. The manual is wrong about the course map size. Use 678 x 480
for the correct size.
Design Tips: Tee Boxes
#1
I have 2 main techniques I use when creating tee boxes. My main objective is to make
them flat and
playable with GBC. Sure, in real like not all tee boxes are perfectly flat, but to
play in GBC it
is important that they are. Here are the 2 techniques that I use:
1. Create the tee box shape. Use more than the standard 4
points at the corner.
Use at least 8 points, so the box will have smooth edges and line up well with
the light rough we will be adding around it.
2. Copy the tee box shape / paste and enlarge by 1 foot and make this
copy light rough.
Place this new light rough around the outside of the tee box shape. This
will provide
and nice border around the tee box. Light rough works better than fringe in my
opinion.
3. Copy the light rough shape / paste and enlarge by 15 feet and
make this copy desert rough.
Place this new desert rough object around the outside of the tee box / light rough shape.
I use desert rough because you can see it around the tee box. Place the desert rough
shape in a manner so it is equal distance around the tee box from all sides.
4. Flatten the desert rough shape to a specific height.
Now, choosing the desert rough shape, hold the shift key and select flatten to highest.
Select the exact height you want *. DO NOT
use the raise / lower height box.
I think many just use the raise / lower box on elevations and this can create some
poor elevation work. That tool not only raises the area selected, but about 10-15
feet
outside of that area is also raised. Learn to use exact height locations and your
courses
will be more accurate and easy to control in the designer.
5. Double Click on the desert rough and enlarge by another 15
feet.
Leave the shape where it is and hit the smooth button 1 time. This will create a
flat tee
box with nice smooth edges coming up on all sides.
Note: This first technique works well as long as the tee boxes
are not too close together.
Tee box build technique #2 will address those types of tee boxes. *
Also, make sure
that when flattening the tee box to a specific height to not over do it. If the
surrounding
area is say 10 feet, raise to maybe 15 feet.
Design Tips: Tee Boxes #2
The 2nd technique is very much like the first. Follow steps 1 - 4 just the same
way.
I try and make sure that no two tee boxes are closer than the 15 feet of desert rough that
surround the tee box. Make sure they do not overlap.
5. Create a sandy rough shape that is 2-3 times bigger than all
the tee boxes.
Select the sandy rough and hit the smooth button one time.
This will ensure that the surrounding area is smooth, while the tee boxes stay flat.
NOTE: The key here is because the tee boxes are so close together, you
cannot smooth like
we did in technique #1. If you do, the tee boxes will NOT be flat. Another
note is, make sure
you are not overdoing the height differences between tee boxes. If so, you will not
be able
to maintain the flat tee boxes when they are so close together.
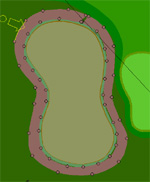
I have 4 basic techniques I use for creating
bunkers in GBC. I feel that many courses that
are being released do not have real good bunkering. Many bunkers are flat or not
smoothed
after a depression is made. I will be showing examples of how I create bunkers that
have
worked very well for me.
Design Tips: Flat Sunken Bunkers #1
1. Create your bunker shape.
2. Copy the shape and then paste as dirt with .5'
larger.
3. Move this dirt shape around the bunker shape to
provide a nice border.
4. Copy the dirt shape and then paste as desert rough with
2.5' larger. Play with this
a little. Sometimes I go as far as 4 or 5 feet larger depending on the bunker
location
and the effect I want to create.
5. Move this desert rough around the outside of the
bunker equal distant on all sides.
6. Move your mouse over the bunker and look at the height reading
in the
bottom right side of the designer. See where the lowest point is. Select
the bunker shape and then you can also click on the flatten to lowest
button while holding the shift key to view the low and high ranges.
7. Now taking into account the lowest point, select the desert
rough and
select flatten to lowest holding on to the shift key. Key in the exact
height you want. I usually use about 2.5 feet below the low point we found
in step# 6. This will create a flat bunker, but lower than the area around it.
Again, play with the depth of feet to get the effect you want.
8. Now using the terrain shape tool we want to draw a circle
around the
outside of the desert rough. Basically you want to have the terrain shape
look like an inner-tube just touching the desert rough and about 2 feet
outside of that. NOTE: We are not just creating a shape
and covering the
whole bunker! It is a circular terrain shape that stays outside of the bunker.
9. Hit smooth on the terrain shape 1 or 2 times
MAX. I usually only use 2
smooth taps if I move the terrain shape farther out from the bunker. This should
keep
the bunker flat while providing a nice slope going down to it.
NOTE: The inner-tube effect works great on many different areas of
designing. Although it
takes more time, it can give great effects. I like using it around greens as well.
If you have a
raised green and you want to smooth the edges, this is the tool. If you just take
the terrain shape
and cover the green and the rough edges and it smooth, it can cause green slope off the
sides or crowning.
Design Tips: Sunken Bunkers #2
This technique is a fast way of creating sunken bunkers. Although not
as slow as the Flat sunken bunkers, it does provide a nice effect.
I have many different ways to do this.
1. Create your bunker shape.
2. Copy the shape and then paste as dirt with .5'
larger.
3. Move this dirt shape around the bunker shape to
provide a nice border.
4. Copy the bunker shape and then paste as a lava
texture and -2.5 feet in size.
Place this lava texture inside the bunker as evenly as possible.
5. Move your mouse over the bunker and look
at the height reading in the
bottom right side of the designer. See where the lowest point is. Select
the bunker shape and then you can also click on the flatten to lowest
button while holding the shift key to view the low and high ranges.
6. Select the lava shape and hit the flatten to lowest
button. We want to put in an
exact height that is about -2.5 feet below the lowest part of the bunker found in
step #5.
7. Next, we will copy the bunker shape and
paste as a desert rough texture and
enlarge by 2.5 feet. Place this equal distant around the bunker.
8. Next, while still selecting the desert rough
texture, hit the smooth button 1 time.
This will give the edges going into the bunker a nice smooth transition.
9. If after step #8, the bunker looks ok then your
ready to do the next bunker.
Sometimes however, I find that 1 more smooth works a little better. This time
I will select the lava texture and smooth it 1 time. This will smooth the inner
part of the bunker.
Design Tips: Sunken Bunkers 2nd Version #3
Basically this is the same as version #2 except at step#7. Instead of adding an
enlarged shape around
the bunker, I use the inner-tube technique from version #1 step #8
Design Tips: Fairway Bunkers #4
I like to either use one of the first 3 versions for fairway bunkers, but I have
some slight changes
that make them a little more playable for longer irons.

This is the technique I use for creating nice
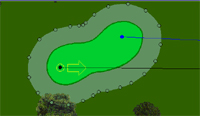
lakes and ponds that are flat.
1. First create a lake or pond shape.
2. Copy the lake shape and paste as hazard and place
equal distant around the lake as shown
in the sample designer screen shot below. I make sure that I enlarge the hazard
shape
by 7.5 feet. Sometimes on small ponds with little depth, maybe 5.0 feet.
I also like to sink my lakes and ponds down to a level that is a least
2.5 feet below the surrounding area. To do this, select the hazard texture and
hold down the shift key while pressing "Flatten to lowest" button on the tool
bar.
This will bring up a box where you want to select the EXACT height and NOT
the lower by amount.
Note: To Copy and Paste as another texture, double click the water texture. A box
will
appear that you change the texture to hazard, and select how much bigger or smaller
you want to make this copied texture.
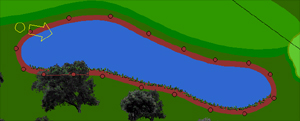
After doing this, this is what it will look like.

3. Now enlarge the hazard shape by double clicking on
it and enlarge by
another 7.5 feet.
4. Next, hit the smooth button 1 time.
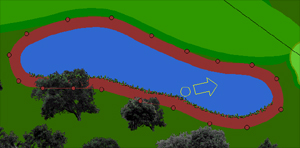
This is the final result. A nice lake or pond that is flat, but has depth
to it versus the surrounding landscape.
For undulating greens, I use
1 of 3 techniques.
1st Technique:
1. Create a green shape.
2. Copy the green shape and enlarge by 2 feet and make
it fringe. Place equal distant around the green.
3. Copy the fringe shape and enlarge by 5 feet and make it light
rough. Place equal distant around the green.
4. Select the light rough and then use the Random Terrain Feature
(Terrain / Random Terrain menu).
5. Play with different setting until you get something that looks
good.
6. Copy the light rough and enlarge by 5 feet and make
it Desert Rough. Place equal distant around the light round.
Then hit smooth 1 time on the Desert Rough. You may have to do small spot smoothes
later on the green, but this will get you started.
7. Delete the Desert Rough shape.
2nd technique:
1. Create a green shape.
2. Copy the green shape and enlarge by 2 feet and make it
fringe. Place equal distant around the green.
3. Copy the fringe shape and enlarge by 5 feet and make it light
rough. Place equal distant around the green.
4. Create a terrain shape and make it about 1/2 or 1/3 the size of
the green (I use a oval shape).
Place it over the green in the area you want raised or lowered.
5. Keeping the terrain shape selected, click on the
"Flatten to Lowest" tool bar icon and hold the shift key.
6. When the box comes up it will show the low and the high range
of the area selected.
7. Type the exact height you want in the "Set to
Height" box. This will set that area to that exact height.
8. Enlarge the terrain shape by 2.5 feet and hit smooth 1
time.
You make have to play with the smoothing a little, to get you desired effect and may
require small spot smoothes.
3nd technique:
1. Create a green shape.
2. Copy the green shape and enlarge by 2 feet and make it
fringe. Place equal distant around the green.
3. Copy the fringe shape and enlarge by 5 feet and make it light
rough. Place equal distant around the green.
4. Try using the one of the 4 slope toolbar icons. They can
give some nice effect if you want
greens that slope from front to back and back to front, etc.
5. Select the light rough texture that you made in step # 3 and
smooth 1 time.
Again, with all of these techniques, using spot smoothing and practice can lead to some
great results.
More coming soon!
© 2001 Copyright to Scott A. Antes Golf Course Design